[ID-PHy] » RPN & HP Calc »
HP-41 » Utility
HP-41 Programming Environment & Bar Codes Generation
Small utilities written in Basic under Microsoft Excel (.XLS files) and under OpenOffice Calc (.ODS files).
For now, only the Bar Codes generation and Listing Format are ported under OpenOffice, sorry.
HP41_ProgEnv.xlsm / HP41_ProgEnv.xls
HP41_BarCodes.xls / HP41_BarCodes.ods
HP41_PRGM.docm / HP41_PRGM.doc / HP41_PRGM.odt
Author : Pierre HARDY
Date : July 2014
First issue in January 2003, major updates in September 2006 (CheckSum bug corrected, 'Private' option added and other enhancements), then in April 2008 (adding Sequenced Bar Codes)
In summer 2010, I've adapted the tool for Excel 2007 (where traditional toolbars have been replaced by the "Ribbon"), re-writen partly some macros, and created new macro to manage toolbars (available in the "Add-Ins" tab) : select active toolbars, create toolbars, create new functions to appear in toolbars (and hence new macros), compute function length, and distance between GTO / XEQ and the corresponding label, ...
Summer 2014 : no real update of my tool, but converted Leo Duran's HP41UC.EXE utility to make it Windows 7 compatible.
It is assumed you have some minimals skills in Microsoft VBA programming, required to adapt/correct some "macro added macros".
Copyright © Pierre Hardy, 2003 - 2014. GNU General Public License.
E-mail author at: pierrehardy01@yahoo.be
» See also
HP-41 related topics :
RPN calculator, HP-IL Manuals and Bar Codes, tools, links ...
» For Sale : If you want me to produce Bar Codes for you (programs, functions, ...), or want to get the some already done.
You'll avoid the prerequisite installation, and save a lot of time ! ;-)
Free HP-41 Utility
The purpose of HP41_ProgEnv.xls spreadsheet and its associated macros
and tool bar is to provide a kind of HP-41 programming environment.
The main programming assistants are :
New in this Excel 2007 version
- a new button (macro) to reset the HP-41 Programming Environment windows : left to top of HP_41PRGM, and right to top of Reg&Notes tabs;
- toolbars set (in Add-Ins tab of the Ribbon) with most HP-41 (and some peripherals) instructions, reducing encoding/editing time;
- set of macros to create / delete / select toolbars that will appear in Add-Ins tab;
- macro to add new toolbars and add new HP41 functions to it : create (write) one macro per HP function;
- conversion of XROM function from name to XROM number at export, and reverse at import, for functions in XROM table (HP41_List sheet);
- macros to compute the instruction length (in col C), and for GTO / XEQ functions, to compute the distance to the corresponding label;
- and for GTO / XEQ functions, macros to compute the distance to the corresponding label, with check if in scope of "short" GTOs (in col B).
Available in first version
- a tool bar with most HP-41 (and some peripherals) instructions, reducing
encoding/editing time : moved to Add-Ins tab in new version;
- export and import function to save the program as Text file (for
their later compilation);
- compile and de-compile function (with prior/post export/import) using
Leo Duran's HP41UC.EXE program;
- launch the HP-41 emulator on successful compile and load the
new code (V41.exe program);
- produce bar codes, using Dan McDonald's macro and sheet.
HP41_BarCodes.xls / HP41_BarCodes.ods contains a set of functions to produce almost any
kind of Bar Codes.
HP41_PRGM.DOC and HP41_PRGM.ODT are Word / Writer "templates" to format the HP-41 code listing.
I build all this to make a "cash register" program (CAISSE in French)
for my daughter, with the printer and WAND. Over the time, upon my daughter request, this became a Pharmacy cash register. So the files provided as template do still have those programs as example. The second version (Excel 2007) is based on a program to manipulate IP addresses (Subnets, mask length, next/previous subnet, larger/smaller mask/subnet, ...), and requires logical operations like AND, NOT, ... found in Advantage module (or HP-IL Development).
Prerequisites
Installation steps
- Install V41 Emulator in same directory as this tool (or reverse !)
- Install fonts
Copy following files to Fonts folder (Start/Settings/Control Panel/Fonts).
- 41bar3.ttf to download
- LCD4.ttf available in V41 install folder
- Unpack 'HP41_PE_BC.zip' file into the same directory as the V41 emulator, or make a copy of V41 in your programming environment folder. Excell 2007 version contains also buttons icons (loaded through macro).
- For Excel 2003 :
- Copy HP_ProgEnv.xls in folder "C:\Program Files\V41". You must put it in that folder, because the path is hardcoded in "HP41 Instructions" toolbar (embedded in spreadsheet). I chose that one because it is the default location for V41 Emulator. Once opened, you can then save it anywhere else (not just copy it), toolbar will updated automatically. As the toolbar refers to one single file, you must always use the same one (sorry for this), unless you move the macro to your PERSONAL.XLS file, and re-map button assigned macros. Or you just have to open the .XLS file with macro prior to use them (didn't tested this). You can check where the button looks for the macro with Tools/Customize.../Toolbars, then select 'HP41 Instructions', right click on any button of it and select Assign macro form menu
- Set the macro security level to Medium (or Low) : Tools/Macro/Security... /Security Level);
- For Excel 2007 :
- Set the macro security level to Medium (or Low) : Office Button (very top left)/Excel Options/Trust Center/Trust Center Settings .../Macro Settings : Enable all macros; and in Developper Macro Settings section : Trust access to the VBA project object model;
- To dynamically create user forms, write macros, you need to set a reference to the "extensibility add-in". To do this, from Visual Basic windows (ALT-F11 in any Excell sheet), go to Tools/References and find the add-in :
"Microsoft Visual Basic for Applications Extensibility X.X" (mine was 5.3 when I wrote this)
- Create tools bars (visible in "Add-Ins" tab of the Ribbon) by running 'CreateHP41ToolBars' macro or clicking on "(Re-) Create Tool Bars" button.
- The 'HP41UC.EXE' compiler and 'V41.EXE' emulator are hardcoded
in macros. Ensure they are present with this exact name - even if new release
issued with other name - and in the same directory (folder) as the HP41_ProgEnv.XLS
file.
- For OpenOffice Calc : Set the macro security level to Medium (or Low): Tools/Options/Security (under OpenOffice.org)/Macro Security...
Programming Environment
First the new version, in Excel 2007 ...
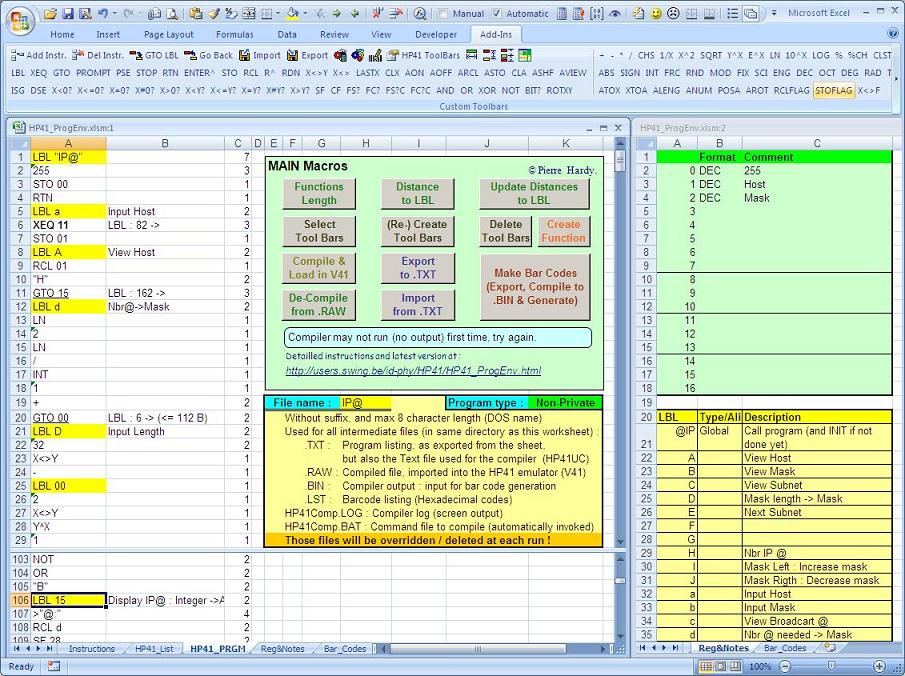
Click on image to get a larger view
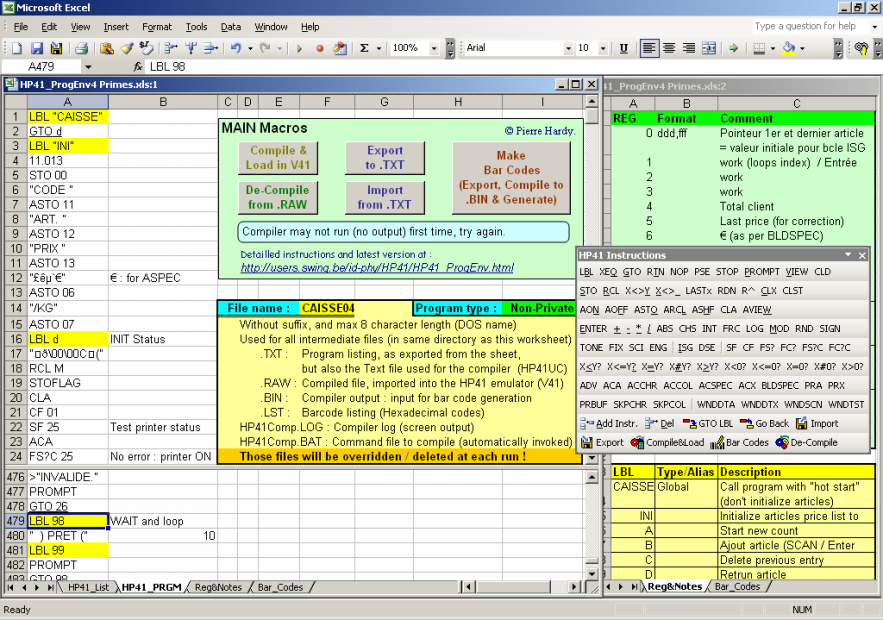
... and the first version, in Excel 2003
New functions in Excel 2007 version
Toolbars
As you (should) know, in Excel 2007, the traditional toolbars are not available anymore, and are replaced by the "Ribbon", but which is quite more difficult to customize. The easiest way I found, is to still work with old toolbars, which will appear now in the "Add-Ins" tab upon activation. Each activated toolbar will appears in a single line, with horizontal scrolling if wider than the Excel window.
Note also that the file extension has changed, being now .XLSM, 'm' for Macro enabled. (And if you want to see the new file structure, change the extension to .ZIP and use your favorite Win ZIP to explore it, you'll be surprised of the content !)
With this in mind, I've created a couple of new macro to create / delete / select and "compose" toolbars.
Create Toolbars
The 'CreateHP41ToolBars' macro (also under '(Re-) Create Tool Bars' button) will create the pre-defined toolbars, which will appear in same order as created. If you want to re-order the toolbars, you'll have to edit this macro. Note that each toolbar is first deleted (if exist) before being re-created.
HP41 Tools
Within toobars set, the first one, named "HP41 Tools", mainly contains programming tools macros (described in more details later on), each displayed with an icon, and in some instances, with text :
 Add Instruction(s)
 Delete Instruction(s)
 Go to Label
 Go Back (from label)
 Import program text file
 Export program to text file
 Compile and Load in V41
 De-compile and import
 Write Bar Codes
 Select HP41 Toolbars
 Update Functions Length
 Distance to Label
 Update Distances to Label
 Reset HP41 Programming Environment
Its content is fixed inside the 'CreateHP41ToolBars' macro.
All other toolbars are dynamically build, through below sub-macro.
Build Toolbar
The 'BuildToolBar' sub-macro is "private" procedure, meaning not accessible from outside the module, hence not listed in available macros from Excel sheet / window. (Many other macros are also "private", and not described here.)
The 'BuildToolBar' sub-macro creates a new toolbar, given its name and a "toolbar tag". Actually, to each HP-41 function available in any toolbar, a corresponding small macro exists in 'HP41_InstrTools' module, and the macro name is prefixed with the toolbar tag. The 'BuildToolBar' sub-macro scans the'HP41_InstrTools' module for all macros (VBA procedures) which name starts with the toolbar tag, then looks for the function named given as string agrument to 'Add_Instr ()' VBA function, which should appear on second macro line (see below). That name is use as button name for the toolbar. If not found on second line, the second part (after tag) of macro name is used instead.
For example, the 'ENTER^' button in 'HP41 Base Functions' toolbar (the second one) run the 'HP_Enter' marco. Here the toolbar tag associated to the 'HP41 Base Functions' toolbar is 'HP_'. All tags should end with underscore ('_'), to clearly distinguish the tag from the function name and avoid any confusion.
Looking to the code, we have :
In 'CreateHP41ToolBars' macro (within 'HP41_Toolbars' module) :
Call BuildToolBar("HP41 Base Functions", "HP_")
and in 'HP41_InstrTools' module :
	Sub HP_Enter()
		Add_Instr ("ENTER^")
	End Sub
Note the function name (ENTER^) is the one displayed on button face, and is the actual HP-41 function inserted, as additional line, into the program. If not recognized, an error will occure at compile time. The macro name usualy contains the same function name after the toolbar tag, except when the function name contains non valid characters (not valid inside a VBA macro name (Sub ...), like operators : + - * /, punctuation : : , ; . ... special characters : $ ^ < ... ). If a macro name contains an invalid character, all macros could be blocked (global VBA compiler error) !
Delete Toolbars
The 'DeleteToolBars' macro deletes all tool bars which name start with "HP41" string, hence the importance of having toolbars particular to this "HP-41 Programming Environmnent" beginning with "HP41". It usually deletes all toolbars created by 'CreateToolBars' macro, and is usefull if you change / rename some toolbars by editing the 'CreateToolBars' macro.
Select Toolbars
Because all buttons of a toolbar is displayed on a single line, I tried to limit the number of functions within a toolbar between 10 and 20. And because of the hundreds of HP-41 functions (including extension modules), I ended with tens of toolbars. Depending on what you're programming, you probably don't need to have all defined functions at hand, so I've writen a macro to select which ones you want to be active / visible.
The 'SelectHP41ToolBars' macro, available via 'Select Tool Bars' button in 'HP41_PRGM' sheet and through the 'HP41 Toolbars' button of 'HP41 Tools' toolbar, build dynamically a VBA UserForm listing all defined HP41 toolbars. From that popup window, you can then select/de-select which one you want to appear or not.
And if you want a function do be part of another toolbar, you just have to edit the corresponding macro name prefix : the toolbar tag.
Within the 'Add-Ins' tab, when you place the mouse pointer on any button, the toolbar name followed by the button name appear as comment/help text.
Create Function ... in an existing or new toolbar
The 'CreateHP41InstrMacro' macro will go through several steps (and input windows) to create new HP-41 functions, hence new macros at the end of 'HP41_InstrTools' module.
Please read carefully instructions herein and in popup windows. Keep in mind that you'll certainly have to edit the new created macros, and possibly the so modified 'CreateHP41ToolBars' macro.
So, if you have no VBA skills (or don't want to learn a minimum of VBA), KEEP OFF !
This said, Create Function process steps are :
- First, a Warning message, to remind where you're stepping in.
- In a second screen, you'll have to specify which toolbar tag to use for new created functions.
- If no entry for specified tag exists in 'CreateToolbars' macro, you'll have to opportunity to create a new tool bar for this tag, and provide it a name (free string, as long as start with "HP41", which would be automatically added if omitted).
- Then, you'll enter in a loop to add new functions. Just type a valid macro name (that will be automatically prefixed with the toolbar tag), usually the HP41 function name. If the function name contains invalid charaters, you'll have to specify a different macro name, and then edit the new macro to correct the actual HP41 function name (string argument of 'Add_Instr' VBA function).
- Last, you may need to go into the macro code and edit it to : correct the HP-41 function name, re-order the macros, switch it to other toolbar by changing the prefix tag, edit the toolbar name, ...
Function's length
I've added a third column (col C) to hold the function length, the number of bytes that function requires in HP-41 program memory. And as I have now the functions length, we can compute the distance between a GTO / XEQ functions and their related LBL.
Function Length function
The 'FctLen' function, available as any other Excel function in cell formulas, compute the number of bytes required in HP-41 memory to store the function (given as argument).
One bytes functions are checked in 'HP41_Set' range of 'HP41_List' sheet; ALPHA strings, numbers, GTO, XEQ, LBL and END functions are treated specifically; and all others unmatched functions (XROM, ...) are defaulted to 2 bytes.
Note that for two consecutive numbers, the second one is one byte longer, because it start with a null byte, which acts as separator (or hidden ENTER). So the number instruction length also depends on previous instruction line, this is why it may be necessary to re-compute all functions length.
This function is also use by the 'Add_Instr' macro, invoqued each time a function is inserted.
Update Functions Length
The 'UpdFctLen' macro, in 'HP41 Tools' toolbar and under the 'Functions Length' button of 'HP41_PRGM', re-compute all functions length.
This is also invoqued by the 'UpdDist2LBL' macro.
Distance to Label
When active cell is a GTO or XEQ function, the 'Dist2LBL' macro computes the distance to the corresponding label, and put it in column B, as comment (overwriting its content). A message will pop up in case of IND call; if the LBL don't exist; and if outside short jump for short GTO (00-15) : this is if the distance is greater than 112 bytes.
The computed distance is the one that would be coded in the GTO/XEQ instruction, at "compile" time on HP-41, as explained in "Synthetic Programming on the HP-41C" book, written by W.C. Wickes (scanned copy available at www.hp41.org / Library / Books).
Update Distances to Label
After updating all functions length ('UpdFctLen'), the 'UpdDist2LBL' re-compute Distances to LBL for all GTO/XEQ functions in the programm. Results are set as comment in column B (overwriting its content), without any pop up messages (as in 'Dist2LBL').
Reset HP41 Programming Environment
Assuming that you have two windows opened (as I suggest), this short 'GoHome' macro will reset the HP41 Programming Environment :
- switch to windowing / normal mode : windows within Excel being not maximised, this to view the two windows side by side
- set the left most window to 'HP41_PRGM' sheet (A1 cell)
- set the right most window to 'Reg&Notes' sheet (A1 cell)
I found this convienent to "restore" my environment, after maximizing a window, swichting to other sheet, ... But is just a shortcut !
As you can see, those new macros involve many funny programming stuff : dynamic code writing, scanning existing code, ... I really had fun writing them. :-)
Writing code
General considerations
Instructions must be in 'HP41_PRGM' sheet, column A, starting in A1 cell. There are
no titles so the row number will correspond to the program line number.
Comments can be placed into column B (without any delimiter, the ';'
being added on export). Distance to label, in bytes, for GTO and XEQ functions will be placed in column B.
Column C will hold the function /intruction length, as coded in the HP-41C, in bytes.
Formatting : for better reading, cells with labels (LBL) are automatically highlighted in yellow, XEQ are in
bold and GTO underlined (conditional formatting).
Key assignments : global labels can be assigned to user keys by suffixing the LBL instruction with " Key: KeyNumber" (not as comment !). For example, 'LBL "IP@" Key: -21' will assign the "IP@" program to 'Shift X<>Y' key. Note that the HP-41 must be in USER mode when reading barcodes to consider key assignments.
'Reg&Notes' sheet is for information only, to let you put comments, for reference, ... (nothing done with it, no import/export, ...). I've formated three sections: Regsiters, Labels and Flags (with their function/meaning) to record use/description. But use it (or not) to your best conveniance.
'Bar_Codes' sheet will hold program generated bar codes, ready to print and scan by the Wand.
'HP41_List' sheet contains :
- all HP-41 functions, function's length in bytes, corresponding character (in various formats), ...
- some other peripherals / modules functions.
This sheet was initially used by Dan's decode macro (BIN2TXT). I've never used it, prefering to work with Leo Duran's compiler. Now I use it as reference (for special character display, ...), in new macros for function length and XROM translation.
Numbers format
Ensure column A is formatted as Text, otherwise number will be interpreted by Excel and reformatted. For example "12E2" will be displayed as "1.20E+03" and (depending on Excel settings ?) will be converted to "1200" when exporting to text file (first step in compile procedure), which is not the same for the HP-41 in term of number of bytes in the program.
To ensure, on each Import/Export (and thus Compile, De-Compile and Bar Codes), column A is reformatted as 'Text' and conditional format are reset (see above).
Compiler accept number in following format :
- 123
- 123.45
- 123,45
- 12 E2
- 12e+2
- 12E-2
- 12E02 (note the '0' will be kept in program, eating one byte)
But compiler output (de-compile) will always give a more canonical format, i.e. '123.45', '12 E2' & '12 E02'.
NB : On RPN calculator, you separate two numbers entry by pressing Enter key. But in programs, or in this tool, you can just delete the Enter entry or input number on consecutive lines. In this case, a null operation is inserted (Hex code 00) between them, so at the end, there is no difference for the HP memory.
Navigation & Windows
To help program more efficiently, I suggest to open two windows (window
/ new window, vertically arranged), one for the code itself (the left one)
on HP41_PRGM tab, and the right one on Reg&Notes tab (for more comment,
use of labels, flags, registers, ... a reminder). But up to you.
There is no debugging tool, however, I wrote two macros (Go2LBL &
GoBack) which allow an easier navigation.
You should also 'split' the HP41_PRGM window horizontally, because
those macros jump between them.
GTO LBL
As you would guess, GTO LBL (Go2LBL macro) will look for a Label and make it the active
cell ... in the lower left pane (hence window split suggestion ;-) ). If,
when calling the macro, the cursor is on a XEQ or GTO instruction, it will
go to the associated label, and otherwise, will ask for a label. Should
be invoked from the upper part, and will show the Label in the lower part
of the split windows.
GoBack
After a Go2LBL call, the GoBack will ... go back to the previous cell (the
one active when calling Go2LBL), and this in the upper left pane. The macro
can go back up to 7 levels (this is the maximum nested subroutine supported
by HP-41). GoBack jumps back to the upper part.
Tool bar
The 'HP41 Instructions' tool bar in old Excel 2003 version, or the 'Add-Ins' tab in new Excel 2007 version, present most HP-41 instructions, plus some added functions/macros (added macros do have an associated icon). To add (insert)
an instruction not in the tool bar, use the 'Add Instr.' button which will
open a input pop up window.
The 'Del' button delete the selected instruction(s) with comments and function length : actually, the "Del Instr" macro operate on three cells wide.
Note : In old Excel 2003 version, some instructions (like 'LBL') have shortcut associated
(ALT-B). To work properly, the corresponding shortcut must be de-activated
on the Menu bar (using 'Customize ...' and removing the '&' from the
name). But this is your customization choice.
Add instructions
Instructions should always be added through the 'Add Instr.' button (Insert_Line macro) or other HP-41 buttons from 'HP41 Instructions' toolbar (Excel 2003) or any toolbar in 'Add-Ins' tab (Excel 2007).
The main reason of this is that the macro does insert cells in columns A to
C, does some formatting and computes function length.
Add Instruction
The 'Add Instr.' button opens a pop up window to let you type one HP-41 instruction
as input string. You can type multiple instructions, separating them with a ';' (if not inside a quoted string).
Input string
All inputs are first formatted as (including the suffix ones) :
- Close quotes : if a string contains only ONE double quote (' " '), then a second
one is added at the end of the string
- Strings are converted to upper case, except if fully quoted, and
except for single character argument 'a' to 'e'
- Strings starting with '>' (the APPEND character) are automatically quoted
(if not already so)
Suffix
For instruction with suffix (TONE, LBL, STO, XEQ, FS?, ...) :
- An input pop up window is invoked
- The '.' as first character of the suffix string is converted to 'IND '
- Number below 10 are reformatted with one leading '0'
- If not already quoted, strings are quoted except single characters
referring to registers / numbers over 101 : A-J, L-Q, T, X-Z, a-e, > ('>' is converted to the "append" char : a synthetic programming register).
STO
If the first character of the suffix string is an operator (+,-,*,/) the instruction is converted
to ST+,... before processing the suffix.
Delete Instruction
The 'Del Instr.' button will delete lines (columns A to C only) of selected cells. Selection must be in column A of 'HP41_PRGM' sheet.
Export/Import, Compile/De-compile & Bar codes generation
The five macros can be invoked either through the 'HP41 Instructions' toolbar or through related buttons on 'HP41_PRGM' sheet (or of course through standard menu).
On each Import/Export (and thus Compile, De-Compile and Bar Codes), column A is reformatted as 'Text' and conditional format are reset (see "General considerations" above).
The diagram below illustrates the scope of each macro, how they interlock with each other, with other programs, and the intermediate files used between them (Dan MacDonal's macro being embedded (with his agreement) in HP41_ProgEnv.xls).
V41 PUT & GET User Code functions are available from V41 File menu, the GET function being automatically invoked by Compile & Load macro.
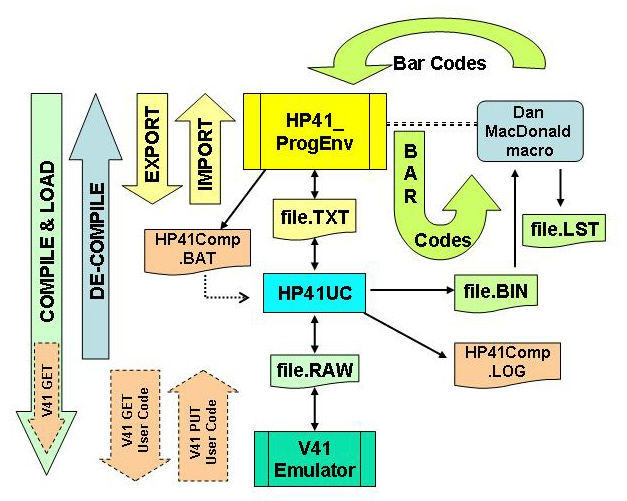
Intermediate files are written/read in the same directory
as the spreadsheet. The file name is taken from "FileName" cell (F14 / H19 in HP41_PRGM sheet version 2003 / 2007).
The file name, without extension, must comply with "native" DOS naming
convention (MAX 8 chars, ...).
Following extensions are used :
- .TXT for text file [macros : Export & Import, (De-)Compile and Bar Codes]
- .RAW for compiled file [macros : (De-)Compile]
- .BIN for compiled file in binary format [macro : Bar Codes]
- .LST for bar codes listing, with hexadecimal strings, as per Dan McDonald's
macro [macro : Bar Codes]
The two following files are also used :
- HP41Comp.BAT for compiler call with all required parameters
- HP41Comp.LOG for compiler log (standard output re-directed)
For (de-)compile function to run properly, the Leo DURAN program (HP41UC.EXE)
and the HP emulator (V41.EXE) must be in the same directory as this worksheet.
Each time the compiler is invoked, its log is presented in a message box, for the user to acknowledge its correct completion before further processing.
*** THOSE FILES WILL BE OVERRIDDEN / DELETED AT EACH OPERATION
***
Export
Instructions in column A, with comments in column B are exported into the
Text file (without converting module functions, see below) :
- The .TXT file is overridden
- When a comment is present next to the instruction in column B, it
is added with 2 TAB and ';' comment separator in front
- If last instruction is not 'END', this one is automatically added.
Import
Read the Text file into columns A and B (comments), and compute function length in column C. XROM codes are tranlated into their equivalent names if the function is present in the XROM table of 'HP41_List' tab ('XROM_Set' range). Function length and conversion are new in Excel 2007 version.
*** THE CONTENT OF COLUMNS A TO C ARE CLEARED BEFORE THE IMPORT ***
Compile & Load in V41
The compile macro do the following :
- First export instructions, converting all external functions to their 'XROM mm,nn' equivalent, if the function is present in the XROM table of 'HP41_List' tab ('XROM_Set' range). This conversion is new in Excel 2007 version.
- Run Leo DURAN compiler (HP41UC.EXE) with the .TXT file as input,
and the .RAW as output
- The compiler result is written in .LOG (with DOS standard output
redirection) and then read into a message box for acknowledgment.
- If acknowledged, the HP-41 emulator (V41.EXE) is launched and the
.RAW file is loaded.
It is recommended to uncheck the 'Auto Save on Exit' option in the
V41 settings before first load so that at each start you start with a "virgin" calculator
(prevent the "reload" of the same program each time, thus having multiple
instances in memory, or insufficient memory error).
De-Compile
If modifications/corrections are made directly within the emulator, you
can export them in a .RAW file (using 'Put User Code ...'). The de-compile
macro will then :
- Run Leo DURAN compiler (HP41UC.EXE) with the .RAW file as input,
and the .TXT as output
- The compiler result is written in .LOG (with DOS standard output
redirection) and then read into a message box for acknowledgment.
- If acknowledged, the .TXT file is imported in the spreadsheet, with XROM conversion.
Write Bar Codes
The BarCodes macro produces the bar codes in Bar_Codes sheet based on instructions
in HP41_PRGM sheet.
Therefore, the instructions are first exported into a .TXT file, then
compiled in .BIN format before re-importing it as bar codes using Dan MacDonald's
macro. A list (.LST) file is also produced (as per Dan's macro) with
the bar codes hexadecimal strings.
Program loaded with WAND may either be normal (editable) or private. Private program are protected against view and edit (no accidental modication). To produce Private bar codes, set PRGM_Type cell (cell I14/K19 in HP41_PRGM sheet) to "Private". Program type is indicated between square brackets on output (.LST file and Bar_Codes sheet, after source file name on second line).
If you want the global labels being assign to user key (as indicated in LBL intruction line), read the barcodes in USER mode.
Bar codes generation is based on Dan MacDonald's macros, which I corrected (small bugs) and partly re-wrote to better fit my needs (separated data input (file names, ...) from processing
itself, added 'Private' option, converted 'GoTo' into Sub routines, ...). Many thanks to him for his valuable work and agreement.
*** THE CONTENT OF 'Bar_Codes' sheet WILL BE ERASED EACH TIME ***
Bar Codes Generation
HP41_BarCodes.XLS / HP41_BarCodes.ODS contains a set of 'User Defined' functions to generate
Bar Codes for HP-41 Wand (bar code reader). Bar codes generated are actually
their hexadecimal string code, with leading and trailing (orientation)
codes, X and Y respectively. When selecting '41C BarCode' as font type,
the string is then display as true bar codes, which can be printed (and
read by the WAND !).
Refer to "Creating Your Own HP-41 Bar Codes Manual, March 1981, Hewlett-Packard"
original book for detailed information, algorithms, ...
This file also contains "ready to use" information and bar codes sheets
:
- HP-41 function list
- HP-41 character set, with name, display on HP-41, on printer, and
its associated bar code
- HP-41 & XROM function sets with bar code
- ...
Caution : I experimented some MEMORY LOST when reading Numeric Data in PRGM mode ! (On a HP-41CV with WAND 1F)
User defined functions :
| Function |
Bar codes string generated |
Argument(s) |
| Char_BC(Char_code) |
Single character |
Character number (integer from 0 to 127) |
| Single_BC(code) |
Single byte keystroke : number 0-9, '.', EEX, CHS, <- (Del) |
Code (from 0 to 15) |
| Funct_BC(Func_code) |
Programmable function |
Function number (integer from 0 to 255) |
| NP_Funct_BC(Func_code) |
Non Programmable function : ON, R/S, PRGM, ... |
Function number (integer from 0 to 15) |
| XROM_BC(XROM_ID, Func_code) |
XROM function |
XROM ID (integer), XROM function number (integer) |
| NumData_BC(Number) |
Numeric data |
Number (integer, long, single, double, decimal, byte, or string) |
| AlphaStr_BC(Str,App) |
Alpha string |
String, Append mode (boolean : TRUE to append) |
| AlphaRge_BC(Rge,App) |
Alpha string |
Range of characters (either its code (integer) or or character itself (takes first one of the string)) making the alpha string,
Append mode (boolean : TRUE to append) |
| DirectXEQ_BC(Func_str) |
Direct execution code (Complete functions) :
Supported functions : GTO, XEQ, RCL, STO, ST+, ST-, ST* & ST/ |
Function string to be directly executed
Example: GTO ABC; XEQ A; XEQ A; XEQ IND 05; GTO d; RCL IND 15; STO 24; ST+ 45; ...
|
Sequenced Data bar codes for WAND Revision 1F only ! (check your version with CATALOG 2)
In Revision 1F, 3 additional bar codes data types are recognized (and produce an error with Revision 1E) :
- Sequenced Numeric Data
- Sequenced Alphanumeric Data in Replace mode
- Sequenced Alphanumeric Data in Append mode
- Sequence number are only used by WNDDTX function, and are ignored in normal scan.
- Sequence number must start at 1 (but coded from 0).
- Sequence number must match the next register sequence number (not memory number). So if previous scanned codes was an alpahnumeric string of 13 characters (which will require 3 registers to store), next sequence number must be incremented by 3 !
|
| SeqNumData_BC(Seq,Number) |
Sequenced Numeric data |
Sequence Number, Number (integer, long, single, double, decimal, byte,
or string) |
| SeqAlphaStr_BC(Seq,Str,App) |
Sequenced Alpha string |
Sequence Number, String, Append mode (boolean : TRUE to append) |
| SeqAlphaRge_BC(Seq,Rge,App) |
Sequenced Alpha string |
Sequence Number, Range of characters (code or char.) making the alpha string,
Append mode (boolean : TRUE to append) |
Private functions
Those funcions are for intern use only (called by other functions), and are not available in Excel, cannot be used in cell formulas :
NumD_BC(...); SeqHdr(...); Build_BC(...); D2Hex(...)
Lock comments in code for more info. |
Usage examples are provided in this file, and also in "Pharma_BarCodes.XLS". Other examples are available as PDF files at my For Sale page.
Get a "Formatted" listing
As the code can became quite long, printing it under Excel / Calc would lead
to pages and pages of listing, with only one thin left column. To solve
this, I made a Microsoft Word / OpenOffice Writer "template" in which you can import
the .TXT file. Document is in three columns, line numbered with special formats :
LBL in bold with typical "caret", XEQ in Bold and GTO underlined.
This is not fully automated, so here how to proceed :
In Microsoft Word 2003:
- Open the Word "template" 'HP41_PRGM.doc' and 'Enable Macros'.
- Clear its content : [Ctrl-a] (select all) then [Delete] (will also delete first section)
- Insert the .TXT file : Insert / File ... / ... (find the .TXT file
: output of EXPORT macro) / Insert
- Run FormatListing macro : Tools / Macros / Macros... (or [Alt-F8])
/ Select 'FormatListing' / Run
In Microsoft Word 2007:
- Open the Word "template" 'HP41_PRGM.docm' and 'Enable Macros'.
- Clear its content : [Ctrl-a] (select all) then [Delete] (will also delete first section)
- Insert the .TXT file : Insert tab / Object (in Text section)/ Text from File ... (find the .TXT file
: output of EXPORT macro) / Insert
- Run FormatListing macro : Developer tab / Macros (or [Alt-F8])
/ Select 'FormatListing' / Run
This version have also some enhancements : line numbers right aligned, "caret" at left.
In OpenOffice Writer :
- Open the Text "template" 'HP41_PRGM.odt' and 'Enable Macros'.
- Clear second section content : Click anywhere in one of the 3 column, [Ctrl-a] (select all) then [Delete]
- Insert the .TXT file : Insert / File ... / ... (find the .TXT file
: output of EXPORT macro) / Insert
- Run FormatListing macro : Tools / Macros / Run Macros... / Select 'FormatListing' (under "HP41 Program" / Standard / HP41_Macros) / Run
Edit first section with your instructions, comments, ...
Print and Save it as usual ...
    HP-41 Programming Environment & Bar Codes Generation
    Copyright © 2003-2014  Pierre Hardy

    This program is free software; you can redistribute it and/or modify
    it under the terms of the GNU General Public License as published by
    the Free Software Foundation; either version 2 of the License, or
    any later version.

    This program is distributed in the hope that it will be useful,
    but WITHOUT ANY WARRANTY; without even the implied warranty of
    MERCHANTABILITY or FITNESS FOR A PARTICULAR PURPOSE.  See the
    GNU General Public License for more details.

    You should have received a copy of the GNU General Public License
    along with this program; if not, write to the Free Software
    Foundation, Inc., 59 Temple Place, Suite 330, Boston, MA  02111-1307  USA
=*=*=
Have Fun =*=*=
(8 - 08/07/2014) ¤

